| Author |
Message |
|
jdub
|
 Posted: Posted: Mon Jun 22, 2009 7:36 am • # 1 |
|
 |
| Administrator |
Joined: 11/18/08
Posts: 3185
Location: Texas
|
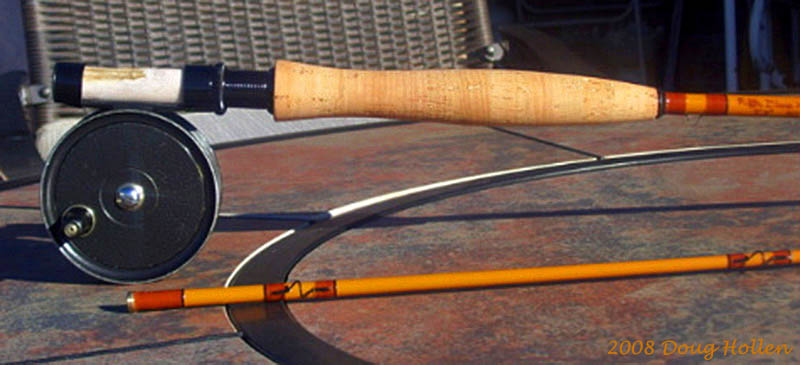
My kids bought me a blank for Fathers Day--a Riffle 'glass 7' 3 wt (I got to pick it out). Because my kids are adults and pretty understanding they let me start on the rod the day *before* Fathers Day (they weren't aware that I had already turned the grip on Friday  ). So Saturday morning I shortened the reel seat insert and glued the seat and grip in place. Saturday evening, while my two daughters and son in law pulled out an old VCR and watched a $1.99 used bookstore copy of Wrath of Khan, I happily wrapped guides. After a very nice Fathers Day dinner yesterday I cleared the table and started applying finish. By midnight I had two coats on and am letting that cure before I decide if I need a third. I haven't tried a line on the rod yet but will do that later today. So far I'm pretty pleased with it. The wraps are Candy Apple Red, Pac Bay single foot guides, cherry burl reel seat insert in a nickel silver downlocking slide ring seat. I ran out of cork rings so I made an emergency run over to the local tackle store--Barlow's Tackle--and picked up a grip for $14. It started out as a reverse half-wells but I quickly turned it into a modified cigar. The cork is surprisingly good quality considering the price. I used the Klass Kote that Don gave me for the wraps. It has an extremely long pot life and is much nicer to work with than Flex Coat. The only issue I had was I had used a black enamel paint pen for the inscription and even though it had dried for 24 hours the Klass Kote totally liquified the paint--something that Flex Coat doesn't do. I quickly grabbed some thinner and was able to get all the inscription off without screwing up the surrounding wraps. That's why you see nice bordering wraps but no inscription  The "measure wrap" at 16" to keep me honest 
Last edited by jdub on Mon Jun 22, 2009 8:21 am, edited 1 time in total.
|
|
| Top |
|
|
jkurtz7
|
Posted: Mon Jun 22, 2009 8:15 am • # 2 |
|
 |
| Administrator |
Joined: 11/17/08
Posts: 4828
|
|
Very nice Jerry. I think that either the Riffle 5'10" or a South Fork 2wt glass will be the next build for me, just not sure when that will happen. If you don't mind me asking, what does Phil charge for his cap and ring seats?
J.
|
|
| Top |
|
|
jdub
|
Posted: Mon Jun 22, 2009 8:27 am • # 3 |
|
|
| Administrator |
Joined: 11/18/08
Posts: 3185
Location: Texas
|
|
Thanks J! I'm not sure what Phil charges because I've purchased the "kit" both times. For $50 you get the reel seat, guides, grip, winding check, etc. The grip he sent worked great for the 5'10" but it looked a little small on the 7' rod so I didn't use it. This time I also saved the snake guides that came in Phil's kit and used some single-foots I already had.
BTW, Phil lists the weight of the 7' blank as 1.1 oz, but it's actually 1.75 oz. One of the reasons I shy away from fiberglass is because of the heft. This 7' is about as heavy as I want to go in a UL rod--it came in at 2.9 oz.
|
|
| Top |
|
|
jkurtz7
|
Posted: Mon Jun 22, 2009 8:44 am • # 4 |
|
|
| Administrator |
Joined: 11/17/08
Posts: 4828
|
|
I'll have to call Phil one of these days and get the low down on all the stuff he has. As for weight, your right. Glass isn't light. I think that for me personally 7' for glass is the limit. I love glass though, and I like shorter rods so it's not that big of a deal I guess.
J.
|
|
| Top |
|
|
Zenkoanhead
|
Posted: Mon Jun 22, 2009 10:31 am • # 5 |
|
 |
| Hero Member |
Joined: 12/22/11
Posts: 2056
|
|
Did you go with the third coat? The first 2 should be completely dry overnight. KK is great stuff, but you have to hold your tongue just right to get that poured look with only 2 coats. You can easily see and sometime feel the thread weave underneath 2 coats. So while protected, it doesn't have that candy coated look of epoxy until a third and fourth coat of KK. If you started in the morning, I'll bet you could get all 3 coats from the same pot. Careful not to overthin though, it needs more viscosity than varnish to work correctly. Don
|
|
| Top |
|
|
jdub
|
Posted: Mon Jun 22, 2009 10:38 am • # 6 |
|
|
| Administrator |
Joined: 11/18/08
Posts: 3185
Location: Texas
|
|
Don I did the first coat about 8pm and the second at 11pm. I need to file the nubs down now and see how it looks. Like you, I have a 10X loupe, but unlike you, mine stays in the drawer while I'm building rods ;-)
|
|
| Top |
|
|
Zenkoanhead
|
Posted: Mon Jun 22, 2009 11:09 am • # 7 |
|
|
| Hero Member |
Joined: 12/22/11
Posts: 2056
|
|
If the nub is really big, mask off all but the tip of a razor blade and cut it off. Careful though, you only have a very thin coat over those wraps and slicing into them is worse than a nub. By the way, didn't you learn how to wrap without leaving nubs? LOL.
I might as well let you in on the secret. The easiest way to avoid a nub is to bring the pull through up to the edge of the wrap, snip the thread as close as possible and pull the short tag completely under. Your pull through should go down as soon as you wrap onto the toe of the foot to give you enough wrap to trap the tag completely. However, if you pull alongside the guidefoot, there will not be enough tension to hold the tag. So, you can pull the tag completely out of the wrap, burnish the threads, then pull the tag straight toward you with pretty firm pressure, the rod being held firmly by the wrapping stand. Then get some tiny bladed scissors and snip the tag flush with the wrap under the tension you applied. The little tag will recoil under the wrap if all goes well.
If it does not disappear completely and if using KK or varnish, let the first coat dry about 30 minutes until sticky. Take your plastic palette knife and press the tag flat onto the sticky surface. You will need that darn loupe to see if it is flat. You can only do this with the first coat as after that the tag stays up until cut off.
With single foot guides you should take 1 1/2 turns in front of the guide, if you can. This puts much more pressure on the tag and blocks the tunnel at the same time. Don
|
|
| Top |
|
|
jdub
|
Posted: Mon Jun 22, 2009 11:26 am • # 8 |
|
|
| Administrator |
Joined: 11/18/08
Posts: 3185
Location: Texas
|
|
I think I need a tutorial, complete with photos. :-) BTW, can you explain how you start the wraps on a single-foot guide without it sliding around? I use those little orthodontic rubber-bands but they don't work very well once you get down to 1/0 guides. Then I switch over to 1/8" wide strips of masking tape, but on a very narrow tip section that doesn't always work either.
|
|
| Top |
|
|
jdub
|
Posted: Mon Jun 22, 2009 11:34 am • # 9 |
|
|
| Administrator |
Joined: 11/18/08
Posts: 3185
Location: Texas
|
Don, here's a closeup of one of the wraps. I don't think I want to go with another coat--it's kind of hard to tell from the photo but you can see the contour of the individual threads which looks kind of cool. More like varnish than epoxy. There are nubs here and there but none are very bad. 
|
|
| Top |
|
|
Zenkoanhead
|
Posted: Mon Jun 22, 2009 11:47 am • # 10 |
|
|
| Hero Member |
Joined: 12/22/11
Posts: 2056
|
|
Can't see the photo here at work, but the "just enough" was very popular with varnish back in the day and is still used by some Permagloss folks. No reason to apply any more that that, but I usually want to fill in the worf (if that is what it is called). The easiest way to hold little guides in place is with guide glue. Heat the guide, touch it to the glue, wipe the excess on some tape stuck to the rod stand, reheat, then stick it to the rod. That gives you a very thin film.
I use tape mostly these days to avoid any glue from oozing out from under the foot, but very thin strips so you can get well onto the toe of the guide before removing the tape. It helps to line up the taped guide before you start the wrap. Don
|
|
| Top |
|
|
robgcp
|
Posted: Mon Jun 22, 2009 2:19 pm • # 11 |
|
 |
| Hero Member |
Joined: 03/08/09
Posts: 2144
|
|
That is one pretty rod...I especially like the contrast of the cherry wraps to the blank....Nice Job...one heck of a nice Father's
Day gift that not only will the gift last for years so will the memories it supplies....Rob
|
|
| Top |
|
|
armyflyfisher
|
Posted: Mon Jun 22, 2009 3:33 pm • # 12 |
|
 |
| Hero Member |
Joined: 11/20/08
Posts: 594
|
|
| Top |
|
|
Zenkoanhead
|
Posted: Mon Jun 22, 2009 3:56 pm • # 13 |
|
|
| Hero Member |
Joined: 12/22/11
Posts: 2056
|
|
See it now. You can go either way. The Just Enough or another coat. I have done it both ways, but almost always add that extra coat. Smooth, but you can see the individual thread turns underneath. It is called the "warp". I looked it up. Don
|
|
| Top |
|
|
jdub
|
Posted: Mon Jun 22, 2009 5:40 pm • # 14 |
|
|
| Administrator |
Joined: 11/18/08
Posts: 3185
Location: Texas
|
Thanks Rob & David! Don, I think I'm going to leave it as is. Any additional finish will just add weight and I like the way it looks. And since you told me the KK only needs 8 hours to cure I decided for a quick evening run up to the pond. Here's the rod with an Orvis Battenkill LA I (original).  I cast it a few times in the yard and thought a DT4 felt good on it, but once I started fishing it I wished I would have taken my DT3 as well. The rod casts very nicely and has a very soft tip. The line I have on this reel is a DT4 cut in half so it's only 45' long. The fish were rising well out into the middle of the pond and there were several times where I cast the entire line and about 10' of backing (plus a 7' leader), so even though it's a short slow rod it can really zing some line out there!
|
|
| Top |
|
|
Zenkoanhead
|
Posted: Tue Jun 23, 2009 6:58 pm • # 15 |
|
|
| Hero Member |
Joined: 12/22/11
Posts: 2056
|
|
You need to do an unbiased review on the Klass Kote as it is a bit of a dark horse and one of the easiest finishes out there. I think it was formerly marketed as Hobby-Poxy and its biggest virtue was that it was impervious to small engine fuel for model planes and cars. This project turned out much nicer than your epoxy wraps. 1st coat to fishing in 12 hours. Can't beat that. I like the color combo you selected too. Don
|
|
| Top |
|
|
jdub
|
Posted: Tue Jun 23, 2009 7:27 pm • # 16 |
|
|
| Administrator |
Joined: 11/18/08
Posts: 3185
Location: Texas
|
|
I still need a little more experience with it but I'm really liking it. By far the most desirable feature of the KK for me is the pot life and the ability to thin the mixture to a very thin consistency. I would rarely get half a rod done with Flex Coat before it started to thicken, and heating it to thin it only shortened the drying time.
|
|
| Top |
|
|
jkurtz7
|
Posted: Wed Jun 24, 2009 5:29 am • # 17 |
|
|
| Administrator |
Joined: 11/17/08
Posts: 4828
|
|
Don your going have to give a KK tutorial. I'm starting to have an interest in this stuff.
J.
|
|
| Top |
|
|
Zenkoanhead
|
Posted: Wed Jun 24, 2009 6:19 am • # 18 |
|
|
| Hero Member |
Joined: 12/22/11
Posts: 2056
|
|
Maybe Jerry and I will do a pictorial of some wraps from start to applying KK. Don
|
|
| Top |
|
|
middlemac
|
Posted: Wed Jun 24, 2009 7:44 am • # 19 |
|
 |
| Newbie |
Joined: 05/31/09
Posts: 5
|
|
Beautiful.
I think all the elements blend so well, and the shaped seat insert is dynamite. Well done.
|
|
| Top |
|
|
jdub
|
Posted: Wed Jun 24, 2009 6:40 pm • # 20 |
|
|
| Administrator |
Joined: 11/18/08
Posts: 3185
Location: Texas
|
middlemac wrote: Beautiful.
I think all the elements blend so well, and the shaped seat insert is dynamite. Well done. Thanks very much! I wish I could take credit for the reel seat insert but I bought it pre-made.
|
|
| Top |
|