| Author |
Message |
|
flflash
|
 Posted: Posted: Fri Apr 12, 2013 12:30 pm • # 1 |
|
 |
| Sr. Member |
Joined: 01/14/13
Posts: 424
Location: Bassville Park Florida
|
"Bonus Section" I got tired of chasing my tools around my tabletop so I made a Tool Holder.  I was walking thru Home Depot and noticed they had large wooden knobs that go on the end of stairwell banisters or bed headboards, I really don't know what their for but their perfectly sized for my purpose  Sanded one smooth, drilled a few holes in various sizes, added some stain. Maybe $5 invested! Top View 
|
|
| Top |
|
|
Roofish
|
Posted: Fri Apr 12, 2013 3:54 pm • # 2 |
|
 |
| Hero Member |
Joined: 01/10/12
Posts: 528
Location: Cedar Park, TEXAS
|
Nice fly, love that tool caddy 
|
|
| Top |
|
|
flflash
|
Posted: Fri Apr 12, 2013 10:09 pm • # 3 |
|
|
| Sr. Member |
Joined: 01/14/13
Posts: 424
Location: Bassville Park Florida
|
Roofish wrote: Nice fly, love that tool caddy Thanks Roo, you know I bought a pair of them maybe I could do a step by step on sanding/drilling and staining the second one. You'd die luaghing at my lack of woodworking skills I do think the stain is a bit to dark on the first one though 
|
|
| Top |
|
|
Cowpokey
|
Posted: Sat Apr 13, 2013 12:34 am • # 4 |
|
 |
| Hero Member |
Joined: 06/23/12
Posts: 1141
Location: Songtan, Korea
|
I like it! Thanks for the step x step. The tool caddie is genius! 
|
|
| Top |
|
|
flflash
|
Posted: Sun Apr 14, 2013 2:04 pm • # 5 |
|
|
| Sr. Member |
Joined: 01/14/13
Posts: 424
Location: Bassville Park Florida
|
Details on tool caddy coming soon, tying bugs right now 
|
|
| Top |
|
|
Roofish
|
Posted: Mon Apr 15, 2013 2:28 am • # 6 |
|
|
| Hero Member |
Joined: 01/10/12
Posts: 528
Location: Cedar Park, TEXAS
|
Your wood working skills look just fine to me. 1 thing about stain, each piece will have it's own unique look which IMHO makes it all the nicer...Keep up the good work
|
|
| Top |
|
|
flflash
|
Posted: Mon Apr 15, 2013 9:41 pm • # 7 |
|
|
| Sr. Member |
Joined: 01/14/13
Posts: 424
Location: Bassville Park Florida
|
Okay here we go.... Tool Caddy. First things first distract my helper for awhile, she's not very helpful.  Still not sure exactly what these are for? I found them at Home Depot 2 for $9.  Here's pretty much everything you need.  Remove the threaded screw and discard, I decided I liked the grain of the bottom side better so I drew a centered circle using the small stain can as a guide then marked out where I wanted the holes.  I used three drill bits 3/8, 1/4 and 3/16. My bobbins fit nicely in the 3/8 scissors and Whip Finisher in the 1/4 and Bodkins in the 3/16. A piece of vinyl tubing makes a good drill stop so your holes are the correct depths.  I laid my holes out a lil differently on this one and gave myself more room between the bobbins, I now have 3 bobbin holes  A piece of felt for the bottom.  A little sanding blow the dust off it then some stain.  There it is simple! I'll let the stain dry for 24 hrs then either Minwax it or clear coat so it's looks sexy, then decide which one I like the best and give the other to my fishin buddy....shhhhhhh don't tell him.
|
|
| Top |
|
|
keebranch
|
Posted: Mon Apr 15, 2013 9:51 pm • # 8 |
|
 |
| Administrator |
Joined: 11/17/08
Posts: 5497
|
|
Fflash,
Cool caddy and great step by step. But what really got my attention is... Is that a pig?
Les
|
|
| Top |
|
|
CBarclay
|
Posted: Mon Apr 15, 2013 10:15 pm • # 9 |
|
 |
| Administrator |
Joined: 06/25/09
Posts: 3259
Location: Winston-Salem, NC
|
keebranch wrote: Fflash,
Cool caddy and great step by step. But what really got my attention is... Is that a pig?
Les My thoughts exactly!? 
|
|
| Top |
|
|
flflash
|
Posted: Tue Apr 16, 2013 9:07 am • # 10 |
|
|
| Sr. Member |
Joined: 01/14/13
Posts: 424
Location: Bassville Park Florida
|
My house is a Zoo! Yes that is a lil pig a Mini Juliana to be exact she's very smart knows some tricks walks on a leash and is housebroken. However anytime I'm sittin in the living room she thinks I either need to be playing with her or she should be asleep in my chair with me. We also have a big loveable Boxer that we rescued, seen asleep on his couch below  A Largemouth Bass, if you click this picture it takes you to a video of my Sandie feeding the him worms.  And a Ball Python that I have no pictures of becuase I don't like getting near it. Snakes scare me but this one needed a place to stay. We also have Rescue squirrels on occasion none right now, we released the last couple we had after they where healthy and old enough and no more have come in.
|
|
| Top |
|
|
simonuca
|
Posted: Sun Apr 21, 2013 3:52 pm • # 11 |
|
 |
| Hero Member |
Joined: 06/19/10
Posts: 1926
Location: Chile
|
|
Thanks for the step by step
|
|
| Top |
|
|
okimoto
|
Posted: Mon Apr 22, 2013 5:50 pm • # 12 |
|
|
| Hero Member |
Joined: 07/12/12
Posts: 987
Location: Georgia
|
|
| Top |
|
|
pearow
|
Posted: Fri Apr 26, 2013 10:36 am • # 13 |
|
 |
| Hero Member |
Joined: 11/18/08
Posts: 1359
|
very nice! to compare- Here's a pic of mine; much less talented and innovative than you are!!!-p- 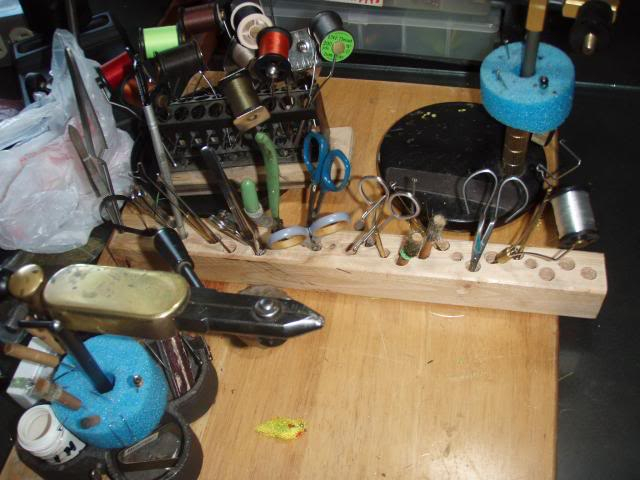 its a 2x2 piece of pine with holes drilled(not very pretty but kinda functional)
|
|
| Top |
|
|
CalJim
|
Posted: Sun Jan 05, 2014 4:29 pm • # 14 |
|
|
| Jr. Member |
Joined: 10/27/12
Posts: 87
Location: Sacramento, Ca
|
|
Brilliant!
I bought my "bun foot" at Home Depot in Ca, $9 something.
They are replacement feet for furniture.
Picked through them for the nicest grain, LOTS of variation.
Layout, drilling, finish only took maybe an hour spread out over a couple days.
Easy, simple, classy looking.
The guys at fly tying jams will be jealous!!
|
|
| Top |
|
